
Clear communication and great consistent service is the key to keeping your district happy, but there are some questions that really shouldn't require you to spend 5 minutes typing out, replying back to, and managing an entire ticket (or email!) each time. Those are the FAQs of your district. Chances are these questions already exist somewhere, posted on different website pages, and managed by multiple teams to answer the most frequently asked questions for their department.
If you're interested in setting this up for your District, be sure to check out our Getting Started Guide to see what the journey looks like.
Introducing the Chatbot
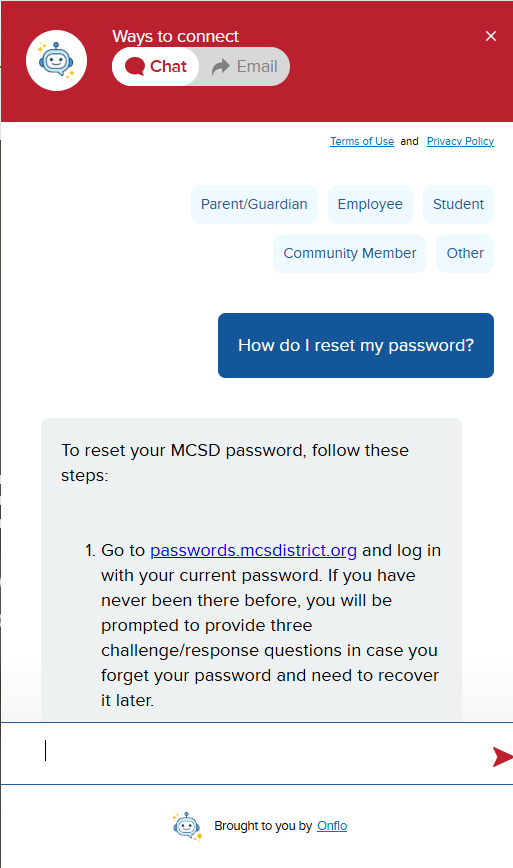
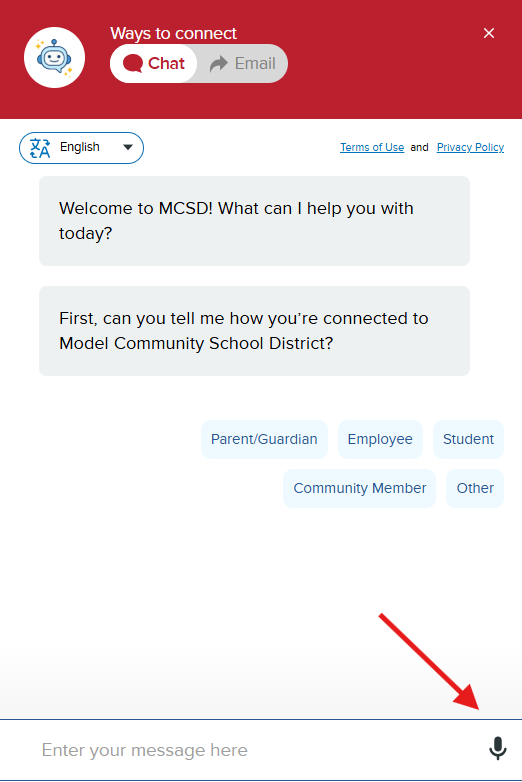
The Chatbot is an AI-based chatbot which can easily be setup, placed on a district website, and have it be the 24-hour front line staff member always available to answer common questions. How does it work? Test it yourself on the Chatbot that lives on MCSD!
On Your District Website
The Onflo (formerly Let's Talk) Assistant is embedded as a tab on your district website. It houses both the Assistant as well as the tab that sends questions directly into Onflo. If you are a System Admin, and your district already has the Onflo tab embedded, then adding the Assistant is simply enabling it within the Landing Page Dashboard, and you’re done!
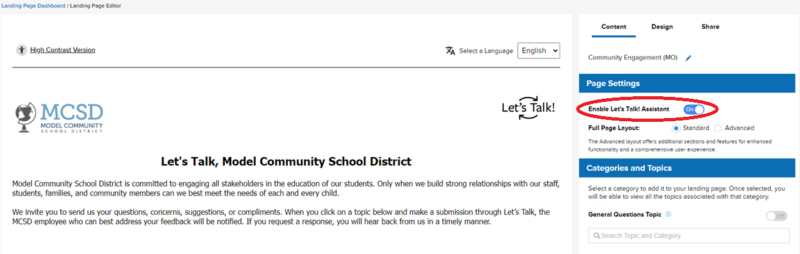
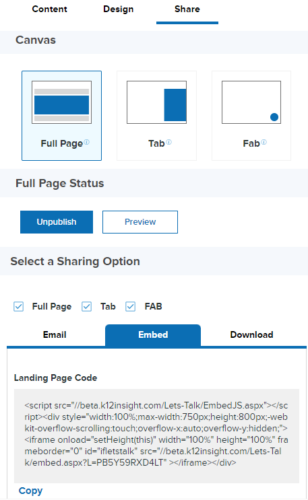
If you don’t already have the Onflo Tab on your website, you can go to Settings > Landing Page/Tab Editor > Enable Let's Talk Assistant, and then toggle to Share to grab the embed code to send to your webmaster. They will know how to use the code to get it up on your website!
Settings
Onflo Chatbot settings live under Settings >Chatbot.
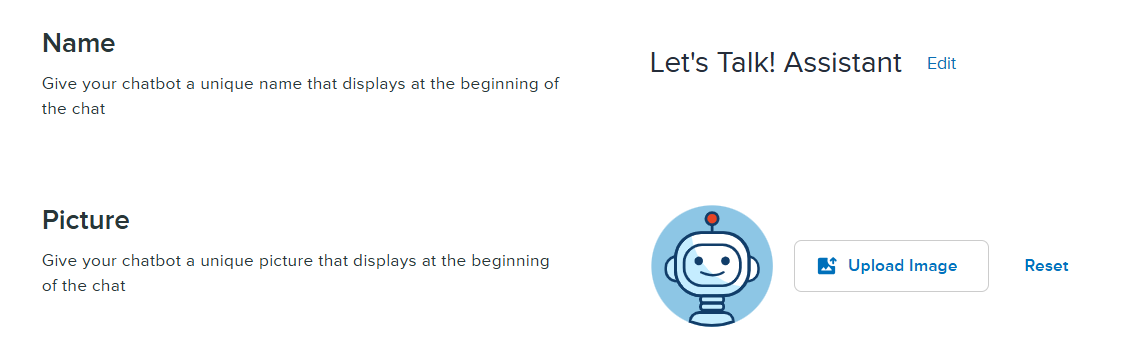
Give your Chatbot a name and photo!
By default, it's called the Chatbot, but we want your district to be able to give this chatbot some personality!
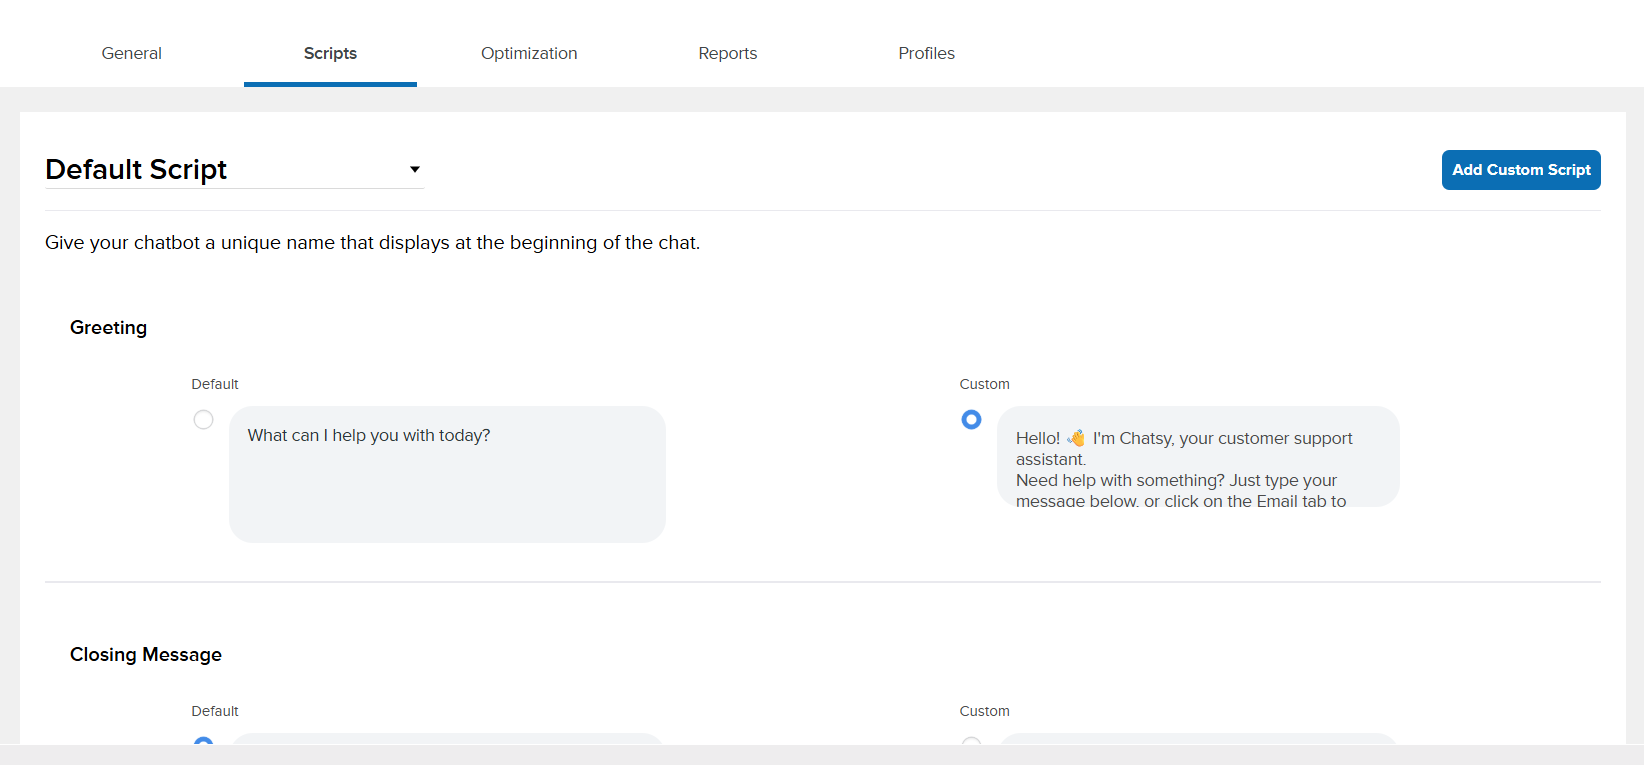
Add/Edit Scripts (Greeting, Closing, Urgent Contact, Error)
In addition to giving the Chatbot a name, you can also change how you want the Chatbot to greet the customers! Under default script, you can the default greetings for:
- Greeting: The opening line! How the Chatbot should say hello.
- Closing Message: The farewell. How the Chatbot should end the chat.
- Urgent Contact: How the Chatbot can direct customers to contact the district directly.
- Error Message: The Chatbot's way of saying they can't understand the question that is being asked.
Chatbot General Settings
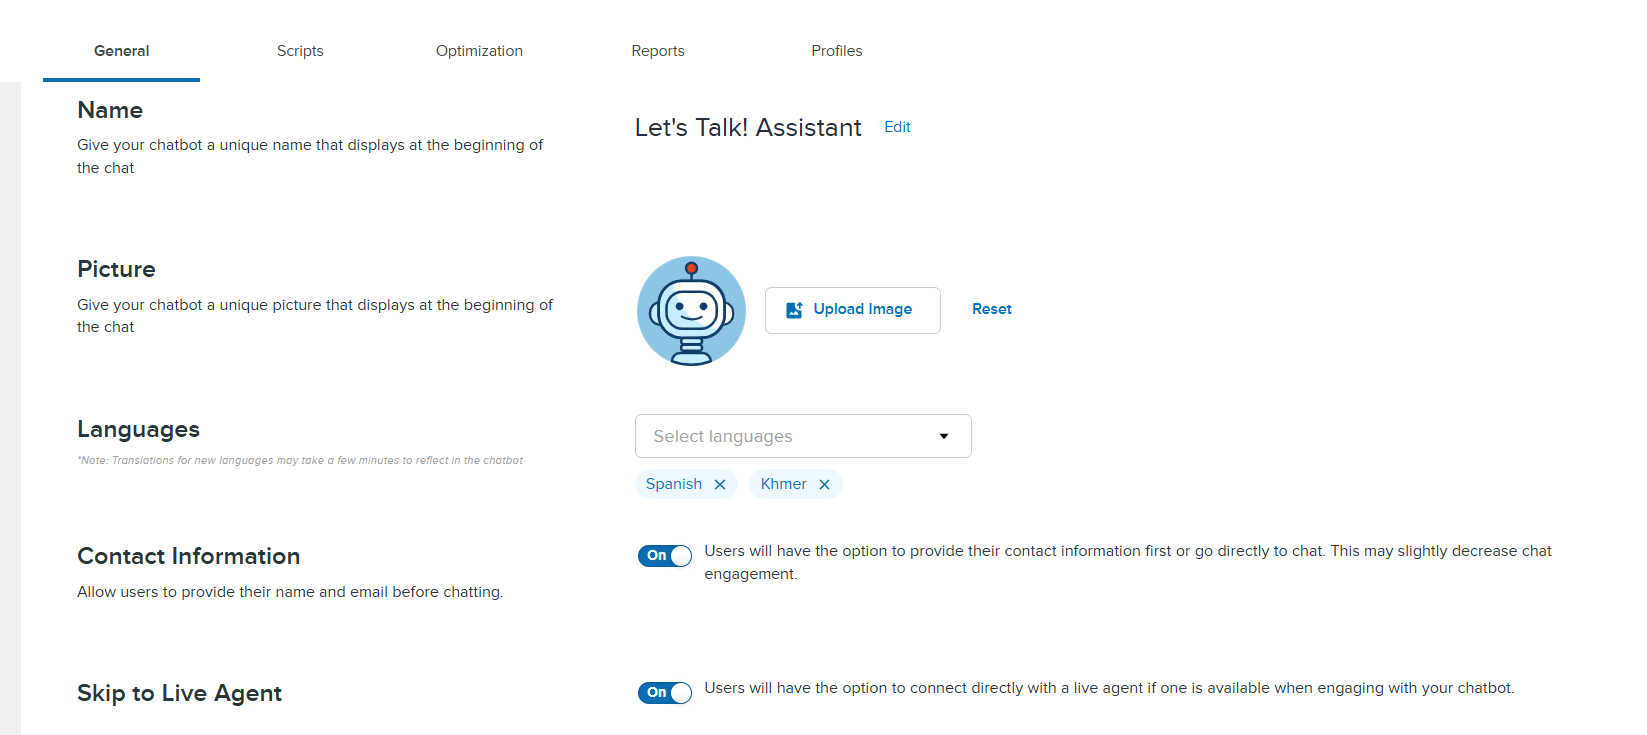
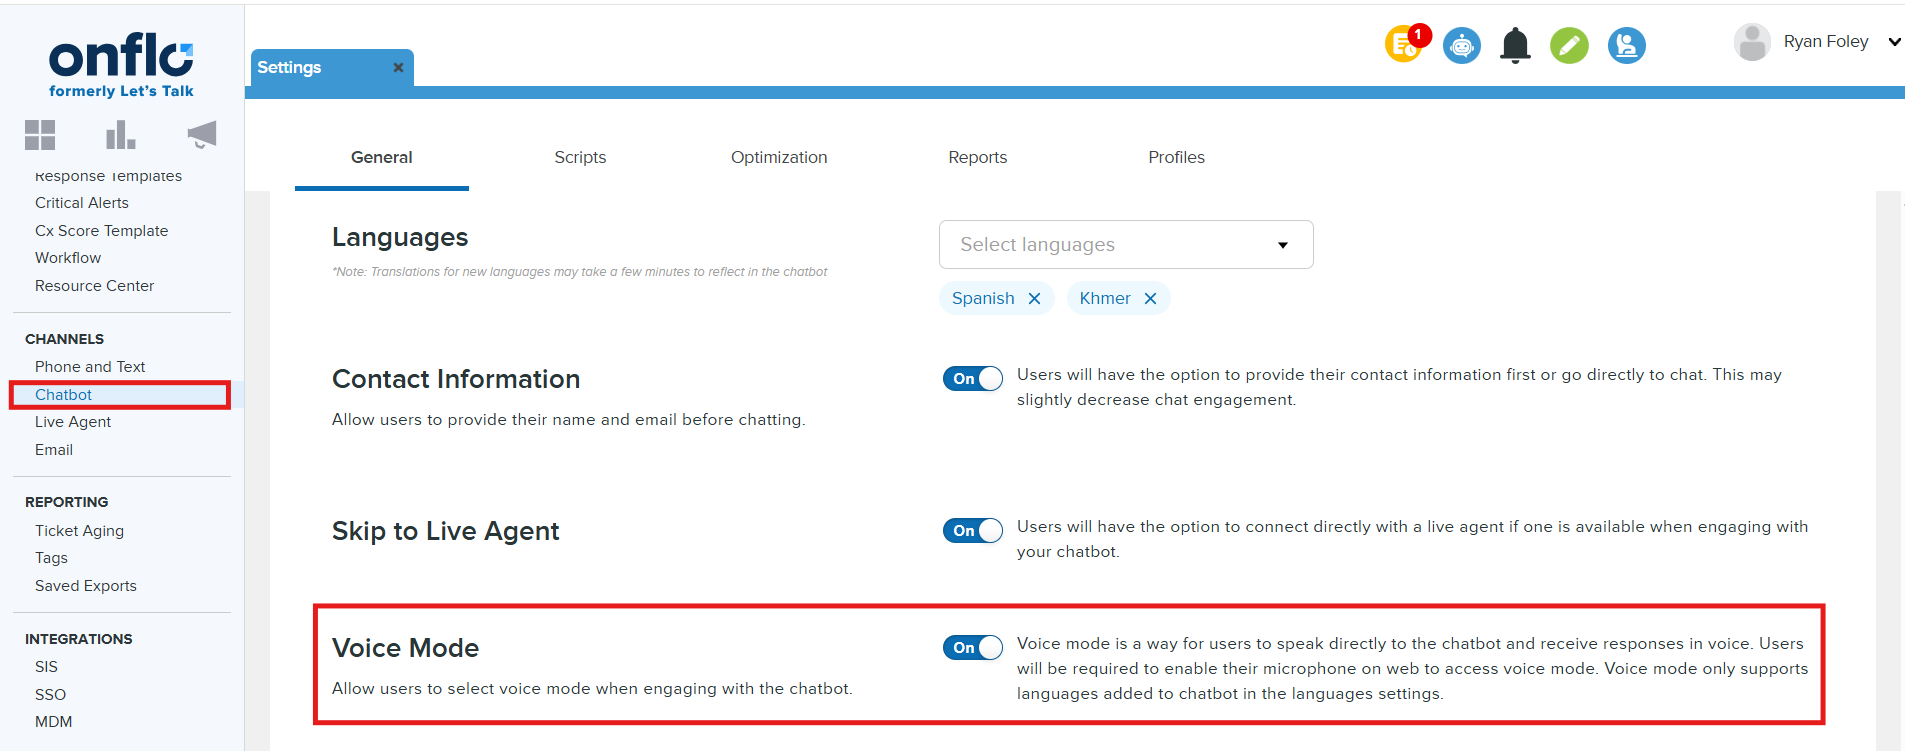
Languages
Provide additional access to all customers with language options available in your chatbot. To enable translation options, select the options you would like from the drop down menu.

Collect Customer Information
System Admins can collect customer names and emails in the chatbot, making it easier to follow up on tickets and send chat transcripts—without adding extra steps for users. To activate this feature, click the toggle button and this will prompt the chatbot to ask for a customer's information when interacting with the chatbot.
Note: Requesting this information may decrease chat engagement. Currently, Chatbot does not have the ability to require customer's to input their information.
Skip to Live Agent
Chatbot users can bypass the chatbot and connect directly with a live agent when available. This feature streamlines support and reduces resolution time for users who need immediate assistance. To activate this feature, click the toggle button and this will prompt the chatbot to ask customer if they prefer to speak directly with a live agent.
Voice Mode
Within Chatbot settings system administrators can enable users to enable voice mode. This feature enables a microphone icon in the chat box to speak their questions (speech-to-text). Users will be required to enable their microphone in their browser to access voice mode. Voice mode only supports languages added to chatbot in the languages settings. To enable this feature, click the toggle to On which will enable the feature within the chatbot.
FAQs
To enable your chatbot to answer Frequently Asked Questions for your chatbot profiles you will first need to create this resource within the Resource Center. For instructions to create this resource please review our article Resource Management: Streamlining Your Content for instructions. Once the resource has been created you will be able to enable the resource for your chatbot profiles.
Accessing Profiles to enable FAQs
To access profiles to enable FAQs navigate to Settings > Chatbot. Next, click on the Profile tab, then select the chatbot profile. Click the FAQ menu, then check the box next to the name of the FAQ resource.
Chat or Ticket?
Whenever a customer uses the Chatbot, each conversation is logged as a Ticket within the Onflo System. Depending on the Customer's interaction, the system will bring it in as either closed tickets, letting you know the inquiry is resolved, or as open, indicating the customer could use some more help.
- If the customer is happy with the Chatbot's response and rates it helpful, or if they leave the chat session completely, the Ticket will come in as closed.
- If the customer is unhappy with the Chatbot's response and rates it unhelpful, or decides to proactively turn their question into a Ticket, it will come in as open.
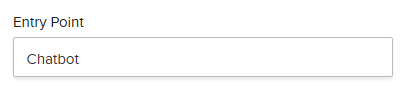
You will know the Ticket came through the Chatbot with the entry point denoted as "Chatbot."
Request Transcript
After customers provide feedback, they are prompted to ask another question, close the chat, or request a transcript. Those who request a transcript are prompted to enter their email address and cannot resume chatting until a valid email address is provided.Connect Directly with an Agent