Loading...
Skip to content
Onflo formerly Lets talk_white
  • Home
  • Articles
    • How-to Articles
    • Getting Started
    • Best Practices
    • FAQs
  • Product Updates
  • Resources
  • Onflo Academy
    • New User Training
    • System Administrator Training
  • Support
  • Home
  • Articles
    • How-to Articles
    • Getting Started
    • Best Practices
    • FAQs
  • Product Updates
  • Resources
  • Onflo Academy
    • New User Training
    • System Administrator Training
  • Support
Log in

Adding Onflo to ClassLink Roster Server Applications

  • Category: How-to Articles
  • Tags: Account Setup, Integrations

More results...

Generic selectors
Exact matches only
Search in title
Search in content
Post Type Selectors

Add the Onflo (formerly Let’s Talk) App

Navigate to the Apps tab.

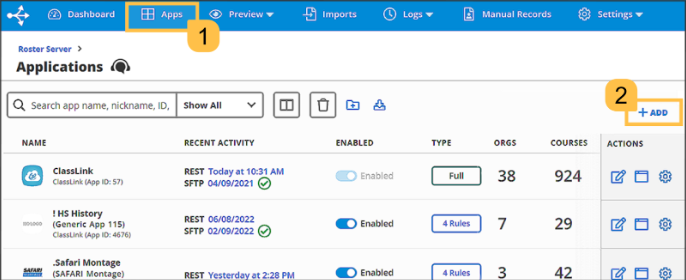
1. Navigate to the Apps tab.

2. Select + ADD

3. Toggle on Show Development Apps

4. Search for Onflo

5. Click the + Add button to add the Onflo Application.

Set Application Permissions

With the Onflo app added it's time to define vendor permissions. Permissions specify how much access the vendor can have to your data for app account provisioning. Roster Server offers three permission types: Rule-Based, Full, and Legacy.

For additional support configuring rule-based permissions, visit the ClassLink help center.

Sharing Data with Onflo

After you've added the Roster Server application and set the app's permissions in your console, the Onflo team will receive an email indicating your institution added our app in Roster Server. The email will contain your REST API URL and a unique API key and secret.

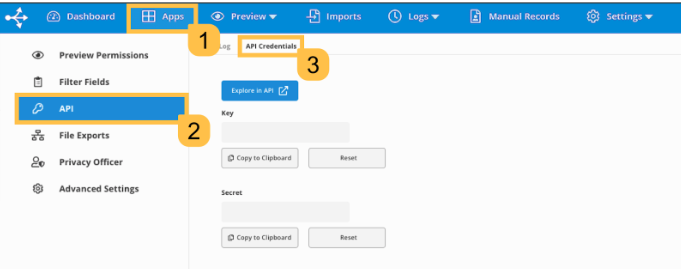
You can view your key and secret in the API Credentials tab on the Onflo app's API page.

PreviousHow to Create Custom Topics
NextForm Builder

Related Post

Twilio Troubleshooting

Table of Contents Mandatory Connectivity Test (Step 1) Firewall & Network Requirements (Mandatory) Required Ports & Protocols Required Domains (FQDNs) Next-Generation Firewall (App-ID) Configuration Common Misconfigurations to Check If Tests Still Fail Quick Validation Checklist (For IT Teams) Summary Twilio

Read More ➜

Tasks for Tickets in Onflo

Overview Onflo allows you to create and assign tasks in tickets. This helps teams collaborate across departments by keeping all related actions and approvals within a single ticket. Each task can include a name, description, and owner, allowing you to

Read More ➜

Departments for Topic Ownership

Aligning your Onflo (formerly Let's Talk!) topics with Departments that mirror your district's structure is important for user and topic management. To manage these settings, System Administrators can navigate to the Departments page within Settings. From these settings you can

Read More ➜
onlo-full-color-splash-page

Need support?

Our Client Services Team is here to help between 7 a.m. – 7 p.m. ET. Get support here or call us at (703) 542-9601.

Mobile App

apple store
g play

Follow Us on

Linkedin Youtube

Quick links

  • Privacy
  • Security
  • Support
  • Training
  • Resources
  • Credits

Articles

  • How-to Articles
  • Product Updates
  • Get Started
  • Best Practices
  • FAQs

Get Newsletter

Sign up to get platform Tips & Tricks delivered directly to your inbox.

Scroll to top